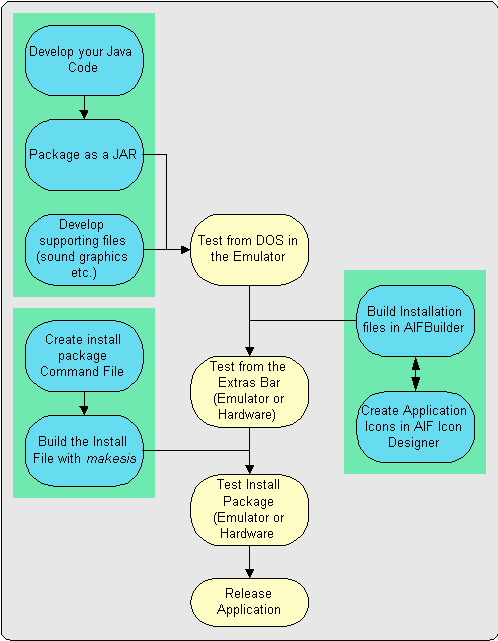
The process of developing a Java application and making it available on a Symbian platform device differs greatly from the processes used on the familiar desktop environments. In this section we will look at this process, using the example application.
The process of developing an application for the Symbian platform has three main steps:
- developing the Java code and supporting files, sound graphics etc. which culminates in testing on the emulator,
- creating the files to deploy the application to the Symbian interface using AIF Builder so it has an icon and can be run from native interface, and
- packaging all the application elements in a release file.

Other activities which may be undertaken as part of a Java development, which we do not discuss in more detail here are:
- development of context sensitive help,
- font development, and
- creation of resource files for multi-lingual installs.
Java Development
Development of a Symbian platform application in Java commences with the standard Java development path, creating the appropriate class files and packaging them into JARS. In doing so the Symbian classes need to be used, this is achieved by adding the following items using -classpath when running javac:
- c:\Symbian\6.0\QuartzJava\erj\lib\classes.zip,
- c:\Symbian\6.0\QuartzJava\erj\ext\javaphone.jar,
- c:\Symbian\6.0\QuartzJava\erj\ext\qawt.jar.
Once this has been done the application can be tested by running it in the emulator. In the case of the sample application this is done, in DOS, with the following command:
| C:\Symbian\6.0\QuartzJava\epoc32\release\wins\udeb\pjava_g.exe -cd j:\examples\QJava -cp QJava.jar -D#com.symbian.appName=”The Java Example” com.symbian.devnet.quartz.qjava.QJava sleep |
The parameters passed to the JVM are:
- -cd which sets the current folder to the application folder,
- -cp which adds the JAR to the classpath and,
- the package method to be run.
You will see that the application has been passed the parameter “sleep”, this causes the application to sleep for 20 seconds before starting. This is needed for all applications run in the emulator from DOS because the emulator takes time to load. The sleep ensures the emulator is fully loaded before the application is started.
Two further things are worth noting here:
- if the application produces output to the Console this will be seen in the DOS window, and
- when the application is exited the emulator also closes.
Obviously running an application from the DOS prompt is somewhat laborious. The main reason that an application would be run in this way is to use the standard Java debug tool through pjava_g. It is a lot more convenient, when not debugging, to run the application from the native interface.
Deploying to the Symbian Interface
Prior to the release of v6.0 of the Symbian platform generating the files to deploy a Java application to the native interface involved the use of DOS commands, text and bitmap source files. With v6.0 these tools have been packaged into a single visual tool called AIF Builder that also includes an Icon Editor.
Using AIF Builder we create:
- an Application Information File which defines the application, its caption and icon file,
- a text file defining the applications additional classpath,
- a mbm (Symbian’s proprietary multiple bit map format) file for the application Icons.
Starting AIF Builder
In a normal install AIF Builder is found under Development Tools in the Symbian 6.0 SDKs start item.

AIF Builder – Application Tab
On opening AIF Builder the usual options to create a new file or open an existing one are available from the menu.
If a new file is being created, as for the QJava application, then the first thing that needs to be done is complete the application details.

By default C++ is selected as the language. If Java is selected an additional field for the Command Line Text is displayed.
Now the following details are entered:
- the Application name, which should be the name given to the program file, in this case QJava,
- the Application UID, which is 01010102 for this example application.
- the Java Command Line Text, which is “-cd j:\examples\QJava -cp QJava.jar -D#com.symbian.appName=”The Java Example” com.symbian.devnet.quartz.qjava.QJava” in this case and this is the same as the -cp command used when running from DOS.
AIF Builder – DFRDs
Having defined the application details, the next step is to provide information for each of the DFRDs the application is to be implemented on, in the DFRDs tab.

The upper pane allows the target DFRDs to be selected. For the QJava application this is Quartz only. Having selected the DFRD the file location details are completed in the Quartz tab in the lower “Customise Icon” pane, as follows:
- mbm file location, this would normally be left blank for a new item and the AIF Icon Editor used to create a new set of icons. Obviously if you have an existing mbm you can enter the file location here. (However the new DFRDs use icon sizes that differ from those used in Epoc R5 and these icons are not imported into the Icon Editor from an existing mbm file.)
- the location to generate the file to. The final target folder is c:\Symbian\6.0\QuartzJava\Epoc32\Wins\c\system\apps\appname. The files can be generated directly into this folder or the folder containing the application (and subsequently copied over, with the JAR file, to the target directory).
- a temporary location to store intermediary files. By default, if no directory is entered, this is set to appname\IntermediteFiles. An alternative, as the intermediate files are not required for application deployment, could be to use a single folder for all these files allowing them to be periodically deleted.
One word of warning, the tabs in the “Customise Icon” pane do not reflect the selected DFRDs, e.g. if you select only Quartz the Crystal tab is still active, so some care needs to be taken to ensure details are entered in the right place.
AIF Builder – Caption
This tab should be self explanatory. The languages your application supports are selected from the Supported Languages list and the caption defined in the right hand pane.

AIF Builder – Capabilities
This tab is not shown for Java (but you will notice it before selecting Java as the language). For C++ and OPL applications it allows definition of:
- whether the application can be embedded (this only applies to C++ applications),
- whether the user can create new files,
- whether the display of the icon on the Extras bar is disabled,
- a list of MIME file types (e.g. non Symbian files without a UID) that the application can handle.
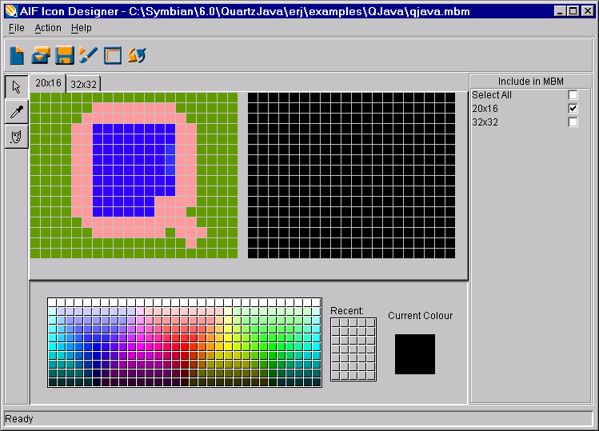
AIF Icon Designer
The Icon Designer is accessed from the Action menu in AIF Builder.
![]()
or from the Edit or Create buttons at the bottom of the Customise Icon frame:
![]()
If a mbm file was not identified in the DFRDs tab, then selecting Create mbm allows a new set of icons to be designed. Edit mbm allows an existing set of Icons to be updated, the file edited is dependant on the current DFRD tab in the DFRD window, e.g. if the Quartz tab is selected the Quartz mbm is opened to edit.

The drawing color is selected from the color map at the bottom of the screen or picked up from the icon using the button:

Effectively you can draw in either pane as changes are mirrored across to the complementary pane, however it is more natural to draw the icon in the left most pane. The crossed bits in the icon pane represent transparent bits, to make them opaque it is necessary to draw in white.
For Quartz only the 20×16 icon is needed (and when displayed is placed in a circle on the Quartz screen). If the 32×32 icon is defined it is used without modification. The icon sizes to be used can be selected in the right most pane.
When the editing of the icon is complete it should be saved. The save name of the file is carried back to the mbm file location in the DFRD details tab of the AIF Builder.
Generating the Application Files
Having created all the necessary information the Generate button in the bottom right hand corner of the AIF Builder Window creates the necessary files.
When generation is complete the files created are confirmed.

Saving the AIF Builder File
Finally the AIF Builder details can be saved for future amendment.
Deploying The Application
The QJava application and the file generated by AIF Builder were all stored in the C:\Symbian\6.0\QuartzJava\erj\examples\QJava directory. Applications are deployed on a Symbian device to the ?:\systems\apps\appname directory which in the emulator for QJava is C:\Symbian\6.0\QuartzJava\Epoc32\Wins\c\system\apps\QJava. To effectively deploy the QJava application the aif, app, jar and txt files are copied from examples to apps.
Running The Application
With the application “installed” on the emulator it can now be run from the Quartz interface. On starting the emulator a new icon for the “Java Example” is displayed.

A single tap on the icon launches the application.
Application Installation Package
While copying the files to the correct directory on a device can be employed as a means to deploy the application it is not to be recommended. The Symbian platform employs a proprietary installation method which uses a sis file. The sis file can then be loaded from a PC in one step through Symbian Connect, in Crystal devices it can also be copied or emailed to and loaded on the device.
The sis file is created using a command file processed by the makesis utility, which is run in the DOS window, a single file containing all the elements of the application, Java code, supporting sound and image files, app, aif and command files, is built to provide the user with a single simple mechanism for installing an application.
The sis file allows for a high level of control over the install (creation of directories, copying of files, display of license and other details) and de-install process. The sis file in this example has been kept quite straightforward, it displays a Yes/No dialog and then installs the application. The following command file was used:
; comment line |
The installation file also supports the following features which we are not using here:
- definition of languages supported,
- language dependant files,
- definition of files to be deleted when removing the application which were not in the install list, e.g. file created by running the application,
- dialog box with a ‘Continue’ button or ‘Yes/No’, where ‘No’ skips the next file to be installed,
- executable files to be run on install, removal or both,
- requisite components, and
- other sis files.
The sis file is then built with the following command:
C:\Symbian\6.0\QuartzJava\erj\examples\QJava\>makesis qjava.pkg Processing qjava.pkg… Created qjava.sis C:\Symbian\6.0\QuartzJava\erj\examples\QJava\> |
The sis file can now be tested, however unlike Pearl and Crystal which include the facility to install sis files directly on a device, Quartz can only load applications through Symbian Connect. Obviously this means that you would not be able to test a sis file on the emulator. To overcome this obvious deficiency for the developer Symbian have made a sis file loader available. This can be downloaded from the Symbian Platform v6.0 Product Support page on the Symbian Developer Network site. Once unzipped this provides a new option within the Quartz Control Panel called “Install a .SIS file”.
To test the sis file it has to first be copied to one of the emulators drives. The default location used by the installer is the c:\ root directory (C:\Symbian\6.0\QuartzJava\Epoc32\Wins\c). Once the file has been copied the install process can be run.
First a dialog that allows the sis file to be selected is displayed.

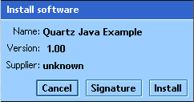
Once the file to load is selected a check is made on whether it has been digitally signed, as our example has not been a warning is issued:
Having accepted that the source is safe a dialog to confirm the installation is displayed:

After which the text file included in our sis file is displayed:

If “Yes” is chosen from the custom message the application is now loaded. If the load takes some time a progress screen is displayed. When the load is complete a confirmation dialog is displayed:

While “Install a .SIS file” allows the sis file to be tested in the emulator it does not include the ability to de-install the application, for which there may be instructions in the sis file.
Also not having a de-install means that retesting the SIS file overwrites the existing install, the installer issues a warning message if this is about to be done. Obviously this is not ideal, but can be partially overcome by manually deleting the application. This involves:
- removing the application directory from c:\system\apps in the emulator,
- removing the install.log and appname.sis file from the c:\system\install directory in the emulator (as the install.log file contains details of all installed files deleting it to remove one install could effect other installed applications), and
- removing any other files copied to other locations or created by the application.
Conclusion
We have now seen how a Java application is:
- developed and then tested in the emulator,
- deployed to the native Symbian interface, and
- packaged for distribution.
Hopefully we have been able to show you that, while this process is different from the one which would be used for a PC development, it is relatively straight forward activity.